> ## Documentation Index
> Fetch the complete documentation index at: https://kwala.network/docs/llms.txt
> Use this file to discover all available pages before exploring further.
# Quickstart
> Get started with Kwala - Set up wallet and get ready to build your first workflow
Before you can create and run Kwala workflows, you need to set up your wallet and get Kwala credits. This guide walks you through the complete setup process in three steps.
## Step 1: Connect your Web3 wallet
Kwala currently supports MetaMask for wallet connections, with support for additional Web3 wallets coming soon.
This quickstart uses MetaMask to connect your wallet and get started with Kwala.
If you don't already have a wallet, download and install one. For MetaMask, visit [metamask.io](https://metamask.io). You'll need to:
* Create a new wallet or import an existing one
* Save your recovery phrase securely
* Configure it for BNB Smart Chain network (required for purchasing credits)
Open the [Kwala dashboard](https://Kwala.network/dashboard), and select **My Workflows** to access the workflow builder.
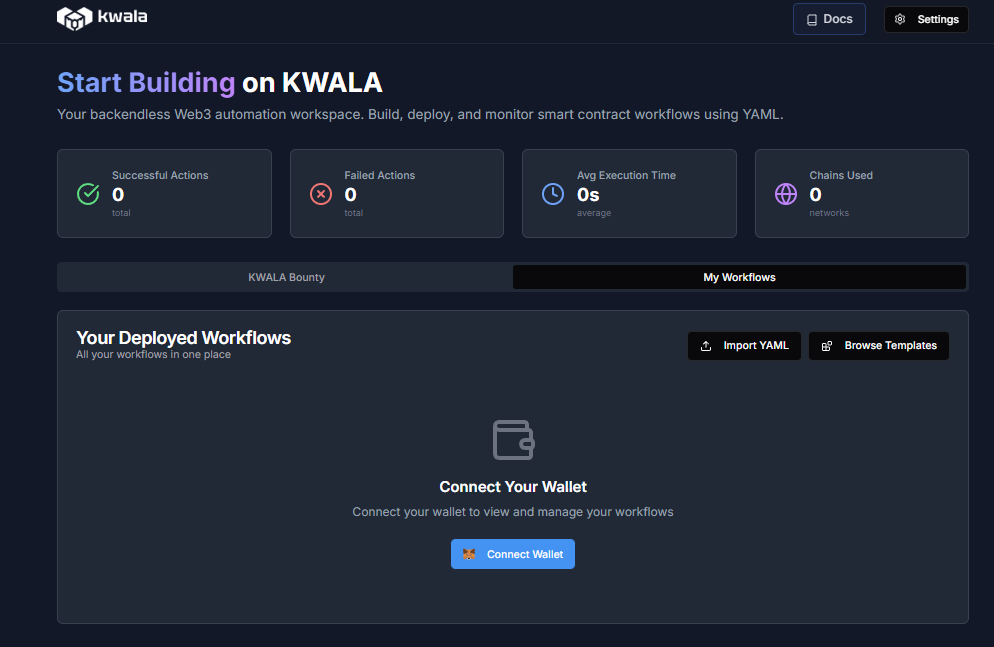 On the dashboard, select the **Connect Wallet** button. Choose your preferred wallet from the available options.
Approve the connection request in your MetaMask wallet to link it with the Kwala network.
Once connected, you'll see your wallet address displayed in the dashboard. You can disconnect your wallet at any time by selecting your address.
## Step 2: Purchase Kwala credits
Kwala uses a credit-based system to execute workflows. Follow these steps to add Kwala credits to your account:
Navigate to [payments.Kwala.network](https://payments.Kwala.network/) to access the payment portal.
Choose your preferred payment method:
* **Wallet Swap**: Directly swap USDT for Kwala credits from your connected wallet (instant)
* **Easy Transfer**: Send USDT to a provided address to purchase credits
For a detailed step-by-step guide on purchasing Kwala credits, including wallet connection and payment methods, see our [Get Kwala Credits](/getting-started/get-kwala-tokens) guide.
## Step 3: Build your first workflow
Once your wallet is set up and you've purchased credits, you're ready to create your first Kwala workflow.
If you're building workflows that monitor smart contract events or execute contract functions, ensure your contracts are deployed. You can deploy smart contracts through Kwala or use a contract that's already deployed on a blockchain of your choice.
Select the **Create Your First Workflow** or **New Workflow** button on your dashboard.
On the dashboard, select the **Connect Wallet** button. Choose your preferred wallet from the available options.
Approve the connection request in your MetaMask wallet to link it with the Kwala network.
Once connected, you'll see your wallet address displayed in the dashboard. You can disconnect your wallet at any time by selecting your address.
## Step 2: Purchase Kwala credits
Kwala uses a credit-based system to execute workflows. Follow these steps to add Kwala credits to your account:
Navigate to [payments.Kwala.network](https://payments.Kwala.network/) to access the payment portal.
Choose your preferred payment method:
* **Wallet Swap**: Directly swap USDT for Kwala credits from your connected wallet (instant)
* **Easy Transfer**: Send USDT to a provided address to purchase credits
For a detailed step-by-step guide on purchasing Kwala credits, including wallet connection and payment methods, see our [Get Kwala Credits](/getting-started/get-kwala-tokens) guide.
## Step 3: Build your first workflow
Once your wallet is set up and you've purchased credits, you're ready to create your first Kwala workflow.
If you're building workflows that monitor smart contract events or execute contract functions, ensure your contracts are deployed. You can deploy smart contracts through Kwala or use a contract that's already deployed on a blockchain of your choice.
Select the **Create Your First Workflow** or **New Workflow** button on your dashboard.
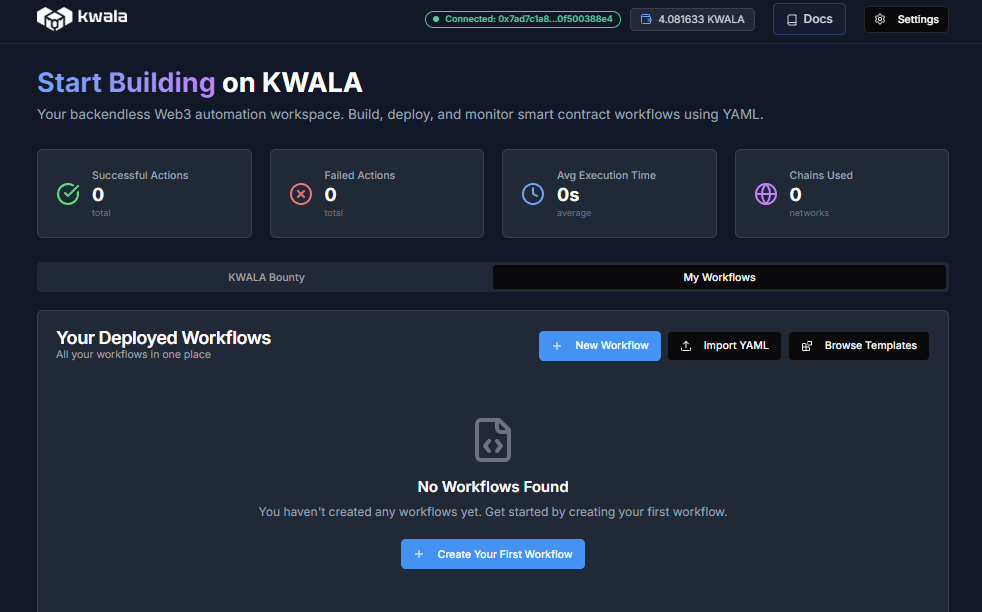 You can either:
* Start from a blank workflow
* Use a pre-built template
* Import an existing YAML file
Use the **Workflow Builder** to visually configure your workflow. This form-based UI lets you set up triggers, actions, and execution settings without writing YAML.
You can either:
* Start from a blank workflow
* Use a pre-built template
* Import an existing YAML file
Use the **Workflow Builder** to visually configure your workflow. This form-based UI lets you set up triggers, actions, and execution settings without writing YAML.
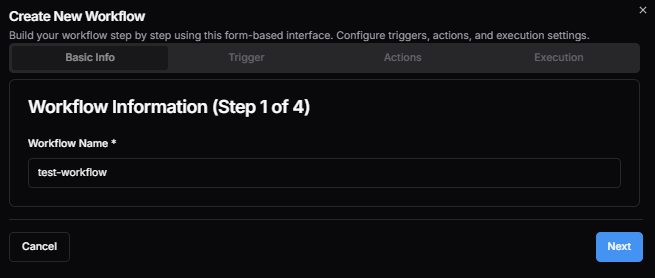 In the workflow builder:
* Provide a name for your workflow
* Add trigger configuration
* Add up to 10 actions to execute when trigger conditions are met
* Configure the execution mode
Once done, Kwala generates the complete YAML automation script based on your configurations. Save the workflow.
After saving, your workflow opens in the **Workflow Editor** where you can view and modify the generated YAML directly.
In the workflow builder:
* Provide a name for your workflow
* Add trigger configuration
* Add up to 10 actions to execute when trigger conditions are met
* Configure the execution mode
Once done, Kwala generates the complete YAML automation script based on your configurations. Save the workflow.
After saving, your workflow opens in the **Workflow Editor** where you can view and modify the generated YAML directly.
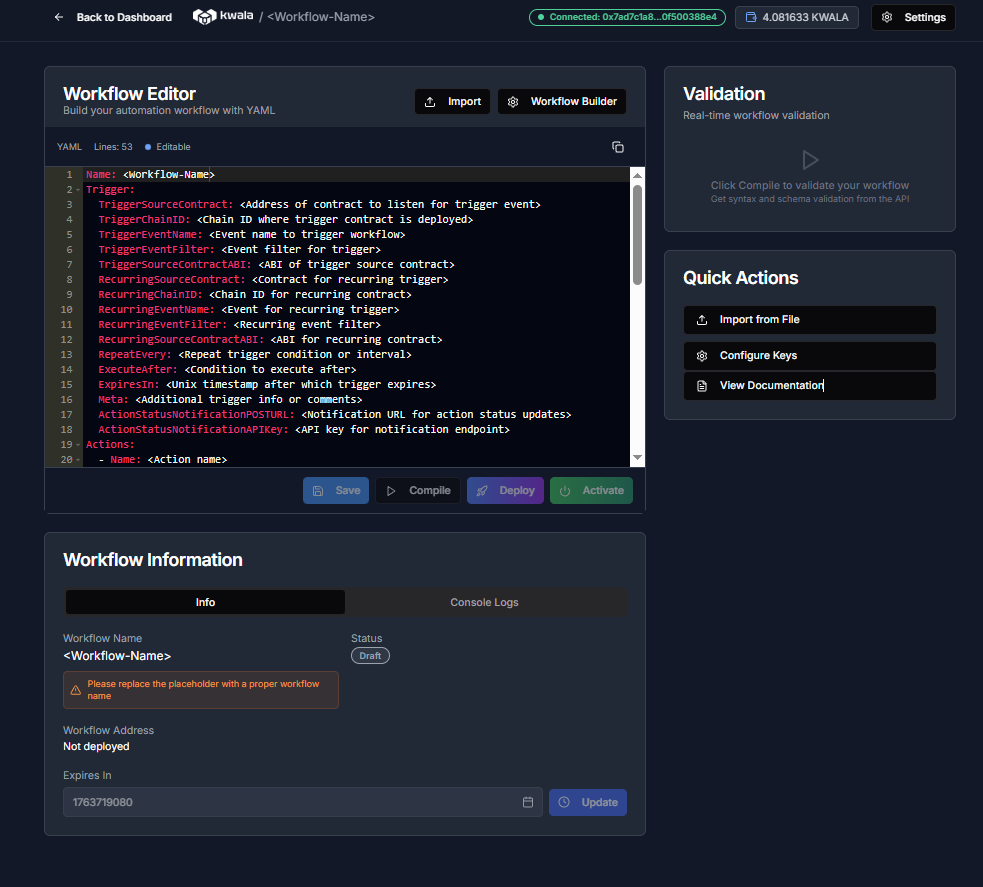 In the workflow editor, you can fine-tune:
* **Name**: Update your workflow's name
* **Execution mode**: Switch between parallel or sequential execution
* **Triggers**: Adjust when your workflow should run
* **Actions**: Modify contract calls, API endpoints, or notification settings
You can switch back to the visual Workflow Builder at any time by selecting the **Workflow Builder** button in the top navigation pane.
Before you deploy the workflow, use the **Compile** feature to validate your configuration. This validates your workflow for syntax and schema correctness. You can use the **Console Logs** tab for more details about your workflow, including any validation errors.
Once you're satisfied with your workflow, **Deploy** it to the Kwala network and **Activate** it.
## Next steps
Learn how to write Kwala scripts
Understanding Kwala's YAML structure
In the workflow editor, you can fine-tune:
* **Name**: Update your workflow's name
* **Execution mode**: Switch between parallel or sequential execution
* **Triggers**: Adjust when your workflow should run
* **Actions**: Modify contract calls, API endpoints, or notification settings
You can switch back to the visual Workflow Builder at any time by selecting the **Workflow Builder** button in the top navigation pane.
Before you deploy the workflow, use the **Compile** feature to validate your configuration. This validates your workflow for syntax and schema correctness. You can use the **Console Logs** tab for more details about your workflow, including any validation errors.
Once you're satisfied with your workflow, **Deploy** it to the Kwala network and **Activate** it.
## Next steps
Learn how to write Kwala scripts
Understanding Kwala's YAML structure